
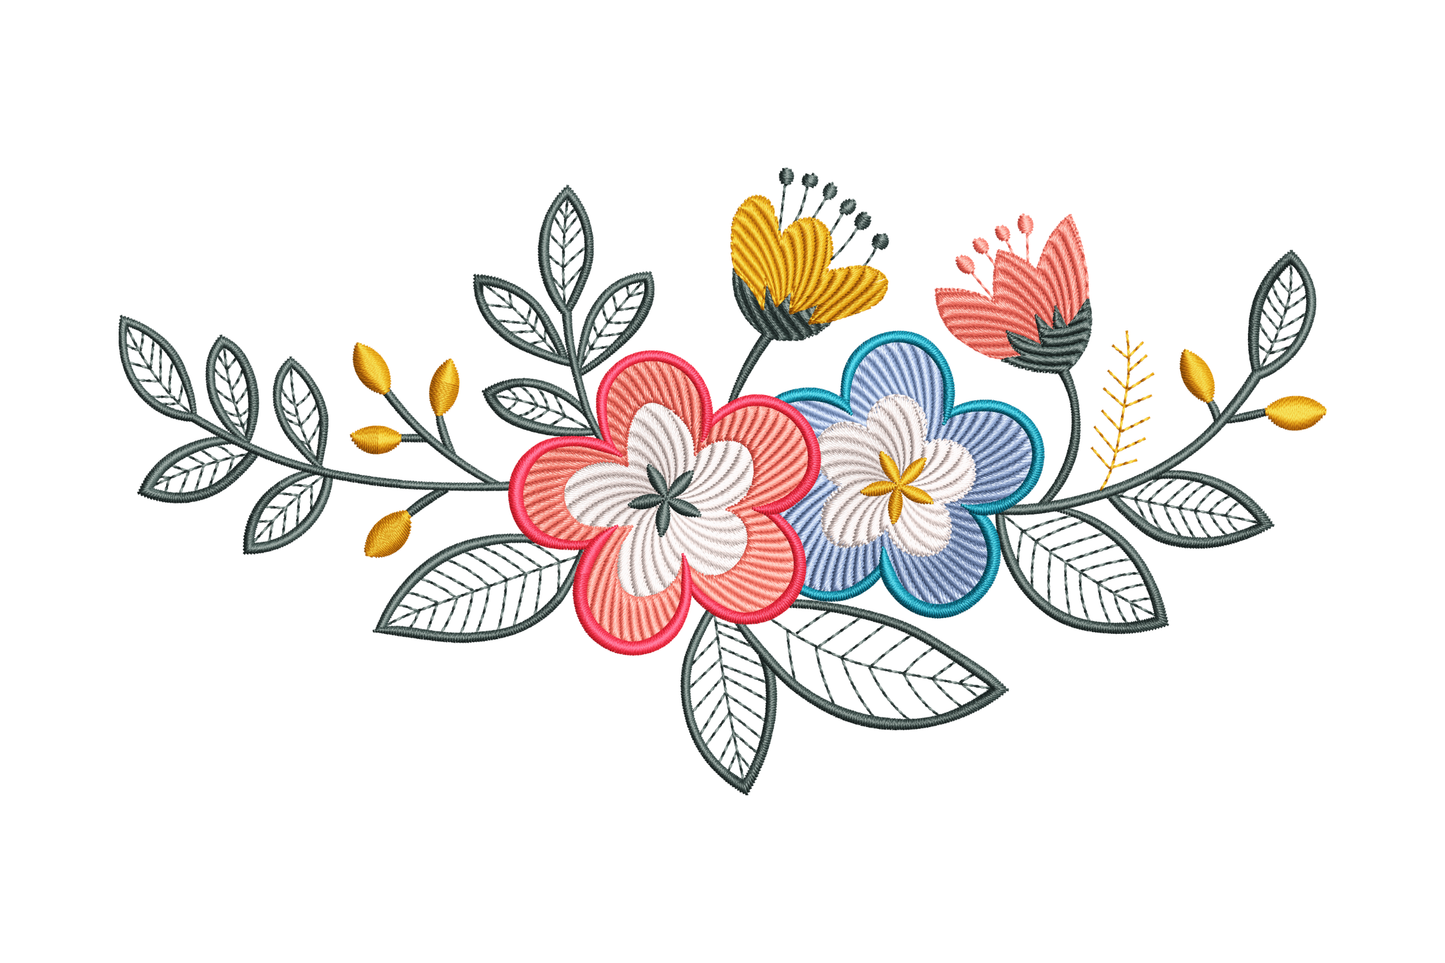
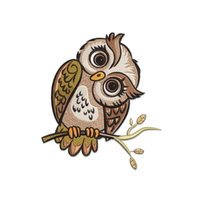
Two big blooms sit right in the centre of this one, a coral-pink flower and a periwinkle blue beside it, both with those directional satin petals fanning outward and cream-white centres that catch light really nicely. The leaves along the branches are outline stitch only, dark charcoal-slate with white tatami fill inside, which gives everything that cottage sketch look. Golden amber buds dot the stems left and right, and there's a taller golden tulip shape rising up from the middle adding a bit of vertical lift. Its that mix of fully filled colour blooms against open outlined foliage that makes this pop without needing alot of colour changes.
I run stems and outlines with a fine satin underlay first, then fill the petal bodies with directional satin rows. Hoop your fabric snug, because if anything shifts mid-stitch the petal alignment goes off and you lose that clean radial look. On stretchy jersey or fleece you'll want a cutaway stabiliser so the whole border stays flat, but on cotton twill or linen canvas a standard tearaway works fine. At 5 inches wide it sits comfortably across a linen tote front or stitched along a tea towel hem. Last week I got a message from a woman who runs a small craft stall, she'd used the 7.5 inch across the back yoke of a denim jacket and it came out brilliant. She sent over a photo and honestly its one of the nicest placements I've seen from this design.
Skip topping on the leaf outlines since they're satin-based and dont need it, but if you're stitching onto terry cloth, a light layer of water-soluble topping over the filled blooms stops the loops catching in the texture. Bobbin tension matters a lot with satin rows here because at roughly 634 stitches per square inch you're working with a medium-high density, and too loose means the underside shows on lighter fabrics. Pop it on white cotton first if you're unsure.
Quite a few cottagecore-style shops have been picking this up lately. The folk botanical mix of open leaf outlines sitting alongside solid filled petals is what keeps it from reading too heavy, and its versatile in a way a lot of border designs arent. One buyer told me she was suprised how clean it came out on a thick linen blend she hadn't tried before. You cant always predict how outline work reads on a tighter weave but in this case it held perfectly.
Center the spray along a hem or cuff for the tidiest finish. Avoid running the smallest 3.5 inch on fabrics with a heavy grain weave because the fine outline stitching can sink and disappear. Pair it with a neutral bobbin thread, usually a cream or light grey, to keep the reverse tidy when the piece is going out unlined.
Message me a photo if the download gives you grief.
What people are using this design for
A starting point. The design works for plenty more than just this list, this is what folks have stitched it onto most.
- Tea towel hem borderRuns clean across a 200gsm linen hem, the border width fits perfectly without trimming the design.
- Linen tote bag frontLay it across the full front of a natural canvas tote at 5 inches wide and theres room to spare on either side.
- Denim jacket back yokeHonestly my favourite spot for this one is the back yoke of a denim jacket, the folk art style suits the fabric.
- Pillowcase edgePlace it along the open edge of a pillowcase in a pale cotton and the outlined leaves stay crisp through washing.
- Cotton apron bibStitch the border across an apron bib in cream twill and it reads as a proper artisan piece at craft fairs.
- Baby quilt cornerBaby quilt corner placements work well at 3.5 inches on a soft cotton flannel square.
- Linen table runnerAdd it down the long edge of a linen table runner for a repeating garden effect at dinner settings.
Dimensions
5 sizes included. Stitch counts shown for the largest colorway.
| Size (in) | Stitches |
|---|---|
| 3.50 × 1.82 in | 8,108 |
| 4.50 × 2.34 in | 10,526 |
| 5.50 × 2.86 in | 13,085 |
| 6.50 × 3.38 in | 15,782 |
| 7.50 × 3.90 in | 18,550 |
Files & Formats
Eight machine formats included in one zip. Whichever your machine reads, its in the pack.


Plus a color chart for thread matching. See full format guide.
Reviews
No reviews yet for this design. Be the first to share your make once you have stitched it. Tag us on Instagram and we will feature your work.
You may also like
Other designs from this collection you might love

Blue Flower Fairy Embroidery Design, Instant Do...

Cherry Blossom Branch Embroidery Design, Spring...

Frog Love Embroidery Design, Cute Valentine Fro...

Your Opinion Is Not Part of the Recipe Embroide...

Fustergluck Kitchen Rooster Embroidery Design, ...

Spring Floral Gnome Embroidery Design, Machine ...

Bee Farm Raw Honey Embroidery Design, Machine E...

Coastal Lighthouse Embroidery Design, Machine E...

Red Tulip Embroidery Design, Machine Embroidery...

Raven on Tree Embroidery Design, Machine Embroi...

Celestial Alpaca Embroidery Design, Machine Emb...

Dog High Five Embroidery Design, Machine Embroi...
Browse by category
Pick a theme, find the perfect design for your next project


About the artist
Reyazul Masud Riham, hand-drawing every design on this site
Every design on Re Embroidery is hand-digitized by one person. Each file gets sketched, color-matched, and stitch-tested on real fabric before it earns a place in the shop. No team. No auto-conversion from images. Just slow, deliberate work, sometimes three or four days per design.
That's the joy I work for.
The hard part is finding my designs re-uploaded and resold elsewhere. So when you buy from Re Embroidery, you're paying one real person for the file you're about to download. That matters.